Discover, Review, Enjoy — Byte by Byte

Tag: gpu passthrough

Proxmox – Enable Intel iGPU Hardware Acceleration

This guide explains how to enable Intel integrated GPU (iGPU) hardware acceleration on a Proxmox host and pass it through to an LXC container (such as Emby) using VAAPI.

Tested on:

  • Proxmox VE 7.x / 8.x
  • Intel N100 / modern Intel iGPUs
  • Debian-based LXC containers

1. Install Intel GPU Drivers on the Proxmox Host

Proxmox already includes the kernel driver. You only need the user-space packages.

Update the Host

apt update && apt full-upgrade -y

Install Intel Media Packages

apt install -y \
intel-media-va-driver \
i965-va-driver \
vainfo \
intel-gpu-tools

On newer Proxmox kernels, intel-media-va-driver (iHD driver) is the important package.
i965-va-driver can remain installed for compatibility.


2. Verify the iGPU Is Detected

Check that the DRM device exists:

ls -l /dev/dri

You should see:

/dev/dri/card0
/dev/dri/renderD128

If you do not see these, check BIOS settings:

  • iGPU enabled
  • Primary display set to Auto or iGPU
  • No headless-disable options enabled

3. Test VAAPI on the Host

Run:

vainfo

Expected output should reference:

  • Intel iHD driver
  • H.264
  • HEVC
  • VP9
  • AV1 decode (supported on N100)

If vainfo works → the host configuration is complete.


4. Prepare the LXC Container for GPU Access

Edit your container configuration:

nano /etc/pve/lxc/<CTID>.conf

Add the following lines:

# Allow GPU devices
lxc.cgroup2.devices.allow: c 226:* rwm# Bind mount DRM devices
lxc.mount.entry: /dev/dri dev/dri none bind,optional,create=dir# Required for iGPU access
lxc.apparmor.profile: unconfined
lxc.cap.drop:

For trusted internal containers (like Emby), this does not meaningfully weaken host security.

Restart the container after saving.


5. Install Intel Drivers Inside the Container

Enter the LXC and update:

apt update && apt upgrade -y

Install VAAPI support:

apt install -y \
intel-media-va-driver \
i965-va-driver \
vainfo \
ffmpeg

6. Verify GPU Access Inside the Container

Check:

ls -l /dev/dri

You should see:

card0
renderD128

Test VAAPI:

vainfo

If this works → GPU passthrough is successful.


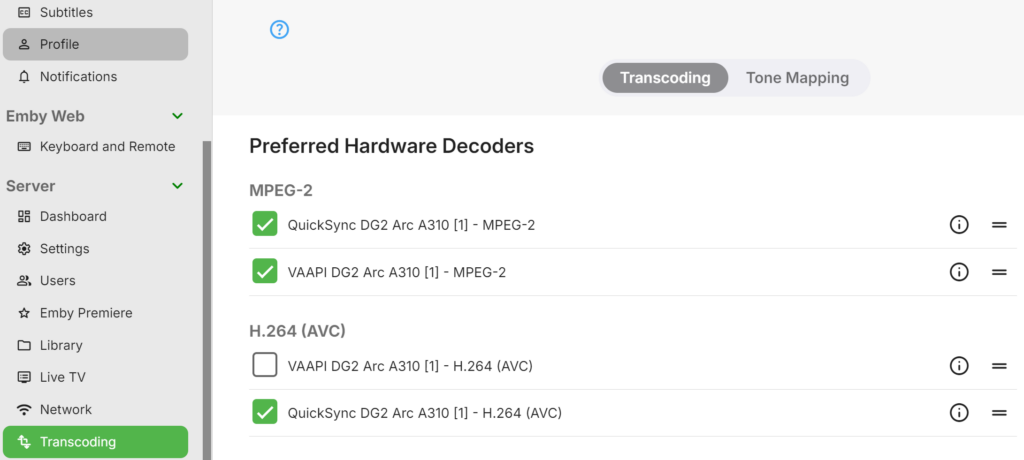
7. Configure Emby for Hardware Transcoding

In Emby Admin:

Dashboard → Playback → Transcoding

Set:

  • Enable hardware acceleration
  • Acceleration API: VAAPI
  • Enable hardware decoding
  • Enable hardware encoding
  • Enable tone mapping (if using HDR → SDR)

Optional (recommended):

Set the transcode temp directory to:

/tmp/emby-transcode

Or use a fast NVMe-backed dataset.


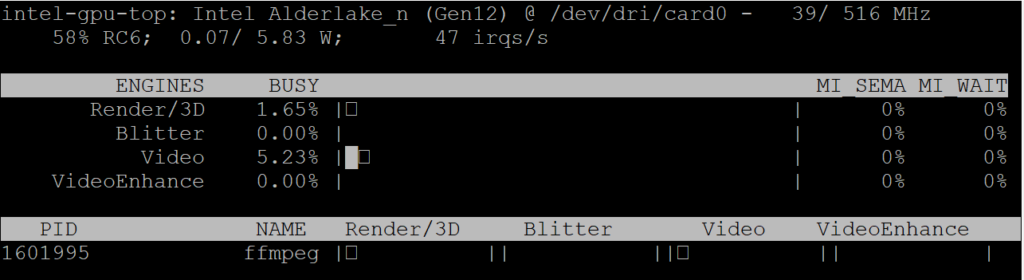
8. Confirm Hardware Transcoding Is Active

Start a file that forces a transcode (not direct play).

Then on the Proxmox host run:

intel_gpu_top

You should see activity under:

  • Video
  • Render

CPU usage should remain low.

If GPU usage increases → hardware acceleration is working correctly.

Proxmox – Emby Intel GPU passthrough

Important: This is for use with Debian 12 (BookWorm) / Proxmox (8.2.7).

This guide is for the setup of an Intel iGPU or dedicated GPU passthrough on Proxmox between an LXC / CT linux system.

Run these commands on both the proxmox host and Emby CT. I have this method working on successfully on both a N100 iGPU and Sparkle Intel Arc A310 ECO

Step 1 – Adding driver download sources
nano /etc/apt/sources.list

add the following

non-free firmwares
deb http://deb.debian.org/debian bookworm non-free-firmware

non-free drivers and components
deb http://deb.debian.org/debian bookworm non-free

Step 2 – Installing the GPU Driver

Install the following
apt update && apt install intel-media-va-driver-non-free intel-gpu-tools

Step 3 – Confirm GPU’s major number’s for fb0 and renderD128

Important: Note down your major numbers from your output my example numbers may not be the same as yours and if this are incorrect the gpu will not work.

cd /dev

Use the following command to list all files and folders in the current directory

ls -lah

Make a note of the numbers in bold for fb0 (If it exists)

crw-rw---- 1 root video 29, 0 Aug 30 21:19 fb0

Navigate to the dri folder using the following command

cd /dev/dri

ls -lah

Make a note of the the number in bold for renderD128

crwxrwxrwx 1 root render 226, 128 Aug 30 21:19 renderD128

Step 4 – Amend Proxmox CT/LXC config to allow access to the GPU

Now we will add the numbers that were noted down to our CT config on proxmox for Emby – Important amend the command below with your CT’s ID number shown the proxmox webgui (Example Below) Mine is 3006

Now open your CT’s config files on your Proxmox host.

nano /etc/pve/lxc/3006.conf

Add the following lines to the file and save using CTRL + O and then enter.
lxc.cgroup2.devices.allow: c 29:* rwm
lxc.cgroup2.devices.allow: c 226:* rwm
lxc.mount.entry: /dev/fb0 dev/fb0 none bind,optional,create=file
lxc.mount.entry: /dev/dri dev/dri none bind,optional,create=dir
lxc.apparmor.profile: unconfined

Step 5 – Adding Persistent GPU Permissions

Important: Giving 777 permissions to your GPU is not considered best practice from a security standpoint. While this approach works, there are more secure methods you can follow. However, I understand the risks and accept them on my system. do this at your own risk…

Adding Persistent GPU Permissions on proxmox host so the GPU is accessible to the CT after reboot.

nano /etc/udev/rules.d/99-renderD128-permissions.rules
KERNEL=="renderD128", MODE="0777"

udevadm control --reload-rules

udevadm trigger

How to Test?

Run the following command on your proxmox shell (This is basically task manager for your GPU)

intel_gpu_top

Step 6 – LXC/CT GPU Driver installation

Repeat Steps 1 and 2 inside your LXC/CT/Emby Shell

How to Test GPU in Emby?

Login to Emby and navigate on the admin webpage to Server > Transcoding. If you see your GPU and a list of Hardware Decoders its likely working. Test forcing something to Trancode by changing the bitrate and monitor the CPU usage and using intel_gpu_top to see if there is any ffmpeg processes running on the GPU

If your not seeing anything on this page I suggest giving your server a little nap (aka, a reboot) see if that makes the GPU driver jumps into life.

Proxmox – Persistent GPU Permission

Important: Giving 777 permissions to your GPU is not considered best practice from a security standpoint. While this approach works, there are more secure methods you can follow. However, I understand the risks and accept them on my system. do this at your own risk…

If you are having issues with GPU transcoding in emby and your GPU permission keep changing after reboot use the following commands to fix the permission.

Run the following command inside your proxmox shell.

nano /etc/udev/rules.d/99-renderD128-permissions.rules

Add the following to the file

KERNEL=="renderD128", MODE="0777"

CTRL + O then Enter to save the changes to the file.

Now run the following command

udevadm control --reload-rules

Run the following command

udevadm trigger

© 2026 bytesmith17

Theme by Anders NorénUp ↑